![]()
The source code of all examples can be downloaded from here.
Collecting and exposing data on the Internet |
|
As you learned in this tutorial, the Raspberry Pi is a wonderful machine to collect data from different sensors, e.g. temperature, humidity, state of a monitored system, GPS, etc. Sometime you process the data immediately, but in other applications the data is stored and processed later, possibly on an other system. To store the data, a local file on the SD card can be used that is move later manually from the SD card, e.g. via a SFTP connection. You also learned how to transfer the data in real time to a control station, using the TCP client/server model. In still another scenario you want to store the data in a Web database so they can be retrieved any time by a Web browser (on any device: PC, tablet, smartphone) with a pleasant site layout, possibly including a graphical data representation. In this chapter you learn the principles how to set up such a application. The same time it is an introduction to the general techniques used for dynamic Web sites. Typically the data flow is as follows:
|
|
|
Setting up an account with a free Internet Service Provider (ISP) |
|
First you need a Web Service Provider (ISP) that provides (few) Web space and PHP to access a MySQL database. If you don't have one yet, you may look for a low cost or even free account. We recommend awardspace.com that offers free web hosting with all features you need to store and retrieve your data. Here a quick tutorial how you setup up a free account.
|
|
Inserting database records from the Raspberry Pi |
|
Aim: Now you understand how to manipulate the database from your browser, you can replace the browser request by a HTTP GET request issued by a Python program. There are different Python libraries to be used for this purpose, here we take the very basic socket library. Of course the program can be executed from any computer with Internet access, whether it is a PC or the Raspberry Pi. Program:[►] # WebServer1.py import socket import time import math host = "www.xxx.dx.am" port = 80 for x in range(0, 101, 5): y = 0.5 + 0.5 * math.sin(0.1 * x) print x, y s = socket.socket(socket.AF_INET, socket.SOCK_STREAM) s.connect((host , port)) request = "GET /insert.php?x=" + str(x) + "&y=" + str(y) + \ " HTTP/1.1\r\nHost: " + host + "\r\n\r\n" s.send(request) s.shutdown(1) s.close() time.sleep(5) print "Done" After you executed the program, you can see the result in your Web browser with the URL: http://www.xxx.dx.am/showall.php In order to start with a clean table, you can remove all records either with phpMyAdmin or from your Web browser with the following PHP script deleteall.php that you put in your Web space (again, use the same line for $con as before): <?php $con= mysqli_connect("host", "username", "password", "database_name", "port"); $sql ="DELETE FROM temperature"; mysqli_query($con, $sql); mysqli_close($con); echo "All records deleted!" ?> |
|
|
Inserting database records via GSM (with the SIM800 modem) |
|
Aim: Consult the site about GSM to learn how to setup and use your SIM800 modem. The module SIM800Modem.py shown there contains the function sendHTTPRequest() that we use to send the GET request. Program:[►] # WebServer2.py import serial import time, sys import datetime from SIM800Modem import * import random APN = "gprs.swisscom.ch" HOST = "www.xxx.dx.am" PORT = 80 SERIAL_PORT = "/dev/ttyAMA0" # Raspberry Pi 2 #SERIAL_PORT = "/dev/ttyS0" # Raspberry Pi 3 print "Resetting modem..." resetModem() ser = serial.Serial(SERIAL_PORT, baudrate = 9600, timeout = 5) if not isReady(ser): print "Modem not ready." sys.exit(0) print "Connecting to GSM net..." connectGSM(ser, APN) while True: startTime = time.time() t = datetime.datetime.now() x = str(t) x = x.replace(" ", "%20") # don't use space in url y = random.randint(1, 100) print "data:", x, y print "Sending HTTP request..." reply = connectTCP(ser, HOST, PORT) if "CONNECT OK" not in reply: print "Connection failed" sys.exit(0) sendHTTPRequest(ser, HOST, "/insert.php?x=" + x + "&y=" + str(y)) print "Closing. Waiting for next transfer" closeTCP(ser) isRunning = True while time.time() - startTime < 60: time.sleep(0.1) Remarks: Since the time it takes to run the first part of the while loop is not well defined, we store the current system time in startTime in the beginning of the loop body and wait in the end of the loop until the elapsed time is 60 seconds that guarantees a period of almost exactly 1 minute. Again, you may request all data any time with a Web browser and the URL: http://www.xxx.dx.am/showall.php The data transferred each minute is less than 100 bytes. In one day this accumulates to about 150 kB and in 1 month to about 4.5 MB, normally well below the monthly limit of a cheap mobile subscription. (Be aware that some GSM providers round up any transfer to a minimum of 1 kB.) |
|
|
Graphical presentation of data using HTML5 |
|
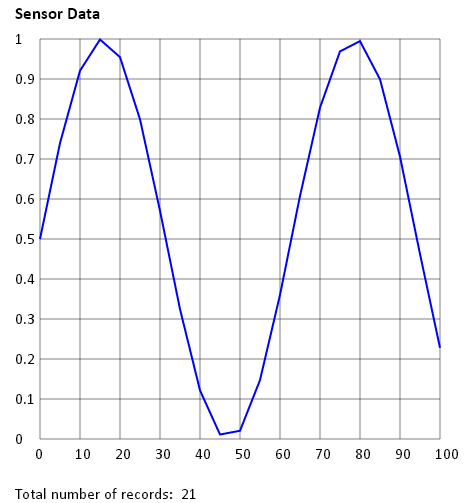
Aim: HTML5 provides a rich support for displaying graphics elements. It is rather simple to combine HTML with PHP and SQL to get the data from the database and display them in a pleasant Web page. HTML file: graphik.php <!DOCTYPE HTML> <meta http-equiv="refresh" content="5" > <?php $con= mysqli_connect("host", "username", "password", "database_name", "port"); $sql = "SELECT * FROM temperature ORDER BY id"; $rs = mysqli_query($con, $sql); $totalRows_rs = mysqli_num_rows($rs); ?> <html> <head> <script> function init(id) { var cmin = 50 var cmax = 450 var cstep = 40 var canvas = document.getElementById(id); var context = canvas.getContext('2d'); context.font = 'bold 13pt Calibri'; // Draw grid context.beginPath(); context.lineWidth = 0.5; for (y = cmin; y <= cmax; y = y + cstep) { context.moveTo(cmin, y); context.lineTo(cmax, y); } for (x = cmin; x <= cmax; x = x + cstep) { context.moveTo(x, cmin); context.lineTo(x, cmax); } context.stroke(); // Draw ticks context.font = '12pt Calibri'; for (i = 0; i <= 10; i = i + 1) context.fillText(10 * i, 45 + 40 * i, 470); for (k = 0; k <= 10; k = k + 1) context.fillText(k / 10, 25, 455 - 40 * k); return context } </script> </head> <body> <h2>Sensor Data</h2> <canvas id="myCanvas" style="position:absolute; top:20px; left:25px" width="500" height="510"></canvas> <script> var context = init('myCanvas') context.beginPath(); context.lineWidth = 2; context.strokeStyle = '#0000ff'; <?php while ($row = mysqli_fetch_assoc($rs)) { if ($row['x'] > 100) break; ?> context.lineTo(<?php echo $row['x'];?> * 4 + 50, 450 - <?php echo $row['y'];?> * 400); <?php } ?> context.stroke(); context.fillText('Total number of records: ' + <?php echo $totalRows_rs ?>, 25, 510); </script> </body> </html> <?php mysqli_free_result($rs); mysqli_close($con); ?>
|