![]()
Introduction |
The main programming language for the Raspberry Pi is Python. Countless programs and library modules are available for all kind of activities using the GPIO interface. But the number and the quality of development environments for Python is still poor. Because Python is an interpreted language, the development cycle is simple: Any text editor can be used to write the source program (often call a Python script). Then the Python interpreter is started that displays an old-style (black) terminal window and the script is loaded and executed using old-fashioned command lines. In modern times where people are accustomed to sophisticated graphical user interfaces, this way of working is outdated. There are several attempts to overcome this deficiency, but modern Python IDEs that are simple to use, but hides the ugly Python shell are still rare. We recommend PyCharm (by JetBrains) for the professional programmer and TigerJython (by Tobias Kohn) and Geany for occasional users, kids and students. Whatever you decide to use, do not underestimate the importance of a simple and stable development environment for beginners. Frustrations with the IDE and the lack of appropriate error messages may spoil your teaching efforts and break down interest and motivation for programming. In this section we present current procedures for programming Python on the Raspberry Pi. But finally we recommend "remote development" with an IDE that runs locally on your notebook/desktop. This shields you from the details of the Linux operating system. The development cycle then resembles to the procedure commonly used with other microprocessor systems like the Arduino, where programs are written/compiled on a "host" and downloaded to the "target" for execution. But in contrast to the Arduino, it is not the machine program, but the source script that is downloaded to the target, where the Python interpreter executes it. Furthermore to facilitate debugging, all output to stdout and stderr (print and error messages) are automatically reported back to the development system and shown in a terminal window without changing any line of code. |
Addons to the NOOBS Distribution |
|
We provide some useful addons to the NOOBs installation as GitHub distribution. Moreover you can download our 8GB SD-card image from here and you are ready to go. Consult the RaspiBrick installation site for more information. The main features of our RaspiBrick firmware are:
|
Typical Development Scenarios |
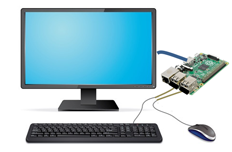
1 Screen/Keyboard/Mouse Attached to the Raspberry Pi
Log in as user: pi with password: raspberry (if you use a wrong keyboard layout, the y may be at the z position, but you don't see it because the password is not visible). In terminal mode you write a Python script using any of the well-known console based editors:
To execute the script, type python <progname> or start the Python shell by typing python and run it with the command execfile("<progname>"). This is a very basic and old-fashioned way of programming, but it still works fine. To start the Linux desktop, type startx. Now you can use one of the GUI based editors, like
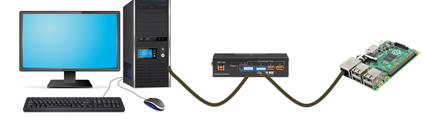
Python programming with IDLE is explained in many online tutorials. It is considered to be somewhat outdated. 2 Remote Terminal (SSH)A. Access via Ethernet Hub/Switch/Router
The router delivers an IP address by its DHCP server, normally in the range 192.168.0.nnn or 192.168.1.nnn. There are many options to find out the last three numbers:
There are some inconveniences with this scenario:
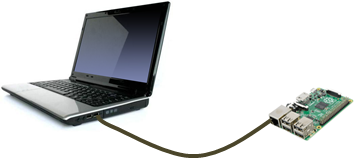
B. Direct Connection via Ethernet
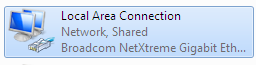
With a trick you can configure a notebook running Windows or MacOS so that it activates a DHCP server on its Ethernet port and thus assigns an IP address to a Raspberry Pi connected to it (if your notebook has no Ethernet port, use an Ethernet-USB adapter). For a Raspberry Pi embedded in a system, this is the recommended configuration. The notebook is used as it would share its WLAN access to the Internet with another device connected to the Ethernet port (ICS: Internet Connection Sharing). It is not really necessary that the notebook is connected to the Internet via WLAN. The setup requires the following steps: Windows 7/8/10:
This will activate a DHCP server on the Ethernet port that provides IP addresses in the segment 192.168.137.nnn (determined by a Windows registry entry). To find out the last three digits, an IP scanner may be used (for example Angry Scanner, see above). Once the connection is established, the PC accesses the Raspberry Pi in the usual way, e.g. with PuTTY, WinSCP or VNC. To prevent the IP address from changing, you can set a fixed IP address for the Ethernet port on the Raspberry Pi by editing the file /etc/dhcpcd.conf. For nnn = 12 insert the following two lines at the end of the file: interface eth0 With our RaspiBrick firmware, this entry can be added with the set_static_ip command, for example set_static_ip 192.168.137.12 Typing set_static_ip remove removes the entry. Note that the Ethernet port of the notebook is no longer available for an ordinary router connection until you remove the share. (To do so, the USB Ethernet adapter must be plugged in.) Remarks: You may also use a second Ethernet port instead of a WLAN. Remember that you must perform the share setup at the adapter that is connected to the Internet, not the adapter that is connected to the Raspberry Pi. MacOS: puTTY is not available on the Mac, but the Mac has a built-in SSH terminal. Just type in the the terminal window (for the IP address 169.254.124.10): ssh pi@169.254.124.10 and you are logged-in with the password raspberry.
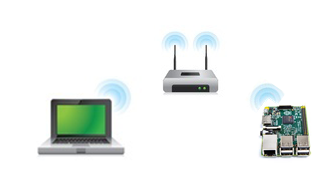
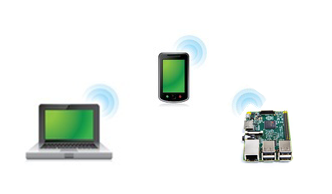
C. Access via WLAN Router/Hotspot/Access Point
Multiple Raspberry Pi's can be accessed with the same router. Modern devices have a Mac-to-IP binding option, so the Raspberry Pi gets always the same fixed IP address. A desktop PC may be connected to the router with an Ethernet cable. You can also run a virtual hotspot using a smartphone app. There are some problems to overcome:
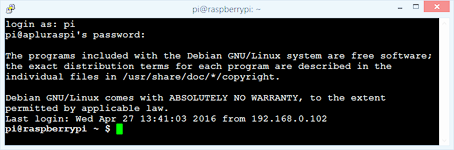
Once the IP connection between the Raspberry Pi and the host system (PC) is established, you may start a remote terminal program that supports SSH (port 22). The most famous free remote terminal program is PuTTY. Log-in as user: pi with password: raspberry and you are at the same point as in scenario 1, except that you cannot start the GUI desktop.
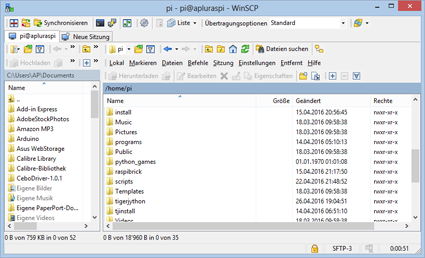
Instead of using SSH commands to transfer and manage files, the comfortable and free GUI based file explorer WinSCP is recommended. Unfortunately is only available under Windows.
3 Virtual DesktopPrerequisites: A TCP link is established and the IP address of the Raspberry Pi is known (see above). With the RaspiBrick firmware, a VNC server is pre-installed and automatically started at boot time. You can access the Raspbian desktop by any VNC client (viewer) running on the development system. There are several free products available for all major operating systems, among them TightVNC and VNC@Viewer. (VNC port number: 5901, password: 123456). Remote desktop operation is widely used for all kind of server management. It provides the "feeling" of a locally attached terminal like in scenario 1 without the necessity to purchase a separate monitor / mouse / keyboard.
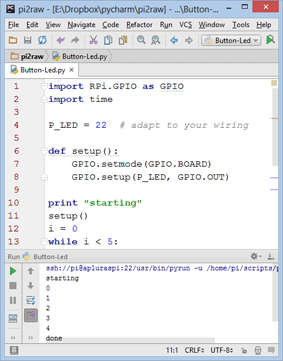
4 Remote IDE - PyCharmPrerequisites: A TCP link is established and the IP address of the Raspberry Pi is known (see above). There are some crucial advantages to perform program development on the host system:
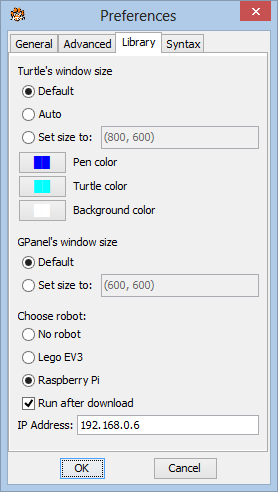
5 Remote IDE - TigerJythonTigerJython is a programming learning platform that comprises a special designed IDE with an full-featured text editor, a debugger, a Python console and many education oriented libraries for turtle graphics, sound, robotics, game development, database applications, etc. The distribution consists of a single JAR file that runs on every platform with a preinstalled JRE. Developed as part of a research project at the Swiss Federal Institute of Technology (ETH) in Zurich, it contains a unique Python parser that performs extended syntax error checking and reporting. A special interface for Robotics with Lego Mindstorm EV3 and Pi2Go (a robot platform using the Raspberry Pi) is smoothly integrated. Python programs are written in TigerJython, downloaded to the robot and executed autonomously with the target Python interpreter (autonomous mode). Programs using the same library calls may also be executed on the host system (remote mode). They communicate with a TCP socket server that runs on the robot (BrickGate) and interprets the transferred commands to control the robot. A rich and carefully designed object-oriented robotics library for Lego EV3 and the Pi2Go is available. To develop Python programs on the Raspberry Pi using the GPIO, a remote execution interface is available that comprises the basic options for downloading and executing Python scripts on the Raspberry Pi. To enable this extra option, select Raspberry Pi in the Preferences dialog.
Most syntax errors are detected prior to downloading/executing the program. Errors (output to stderr) and Python print (output to stdout) are displayed in the TigerJython's Output window.
Because TigerJython communicates with the Raspberry Pi by using some SSH copy and remote execution commands and results are reported back in TigerJython's Output window, some additional shell scripts are necessary that are part of our RaspiBrick firmware.
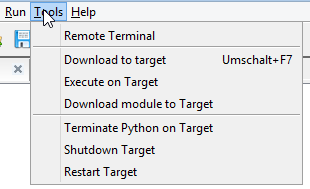
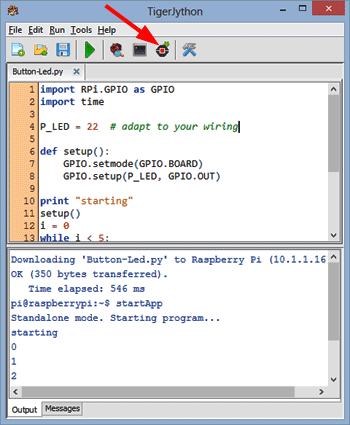
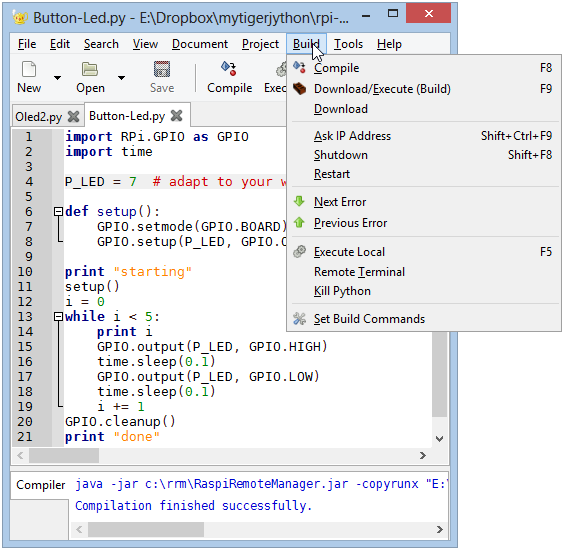
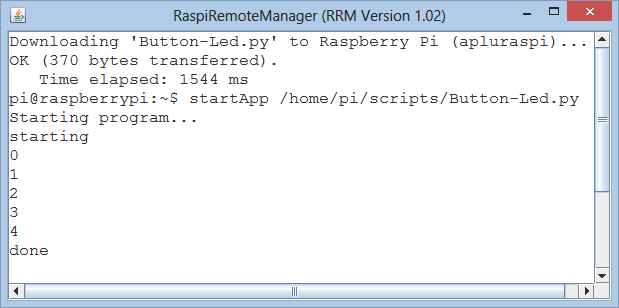
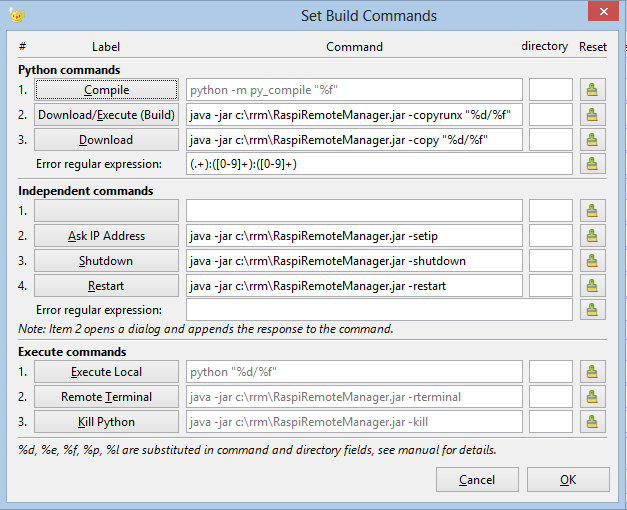
6 Remote IDE - GeanyGeany is a flexible program editor that is widely user-configurable. It is the recommended editor for the Raspberry Pi when working in the GUI desktop (with a directly connected terminal or via VNC). We provide a Java-based RaspiRemoteManager (RRM) tool that integrates smoothly into the Geany Build Commands. With RRM Geany may run at a remote development system under Mac/Linux/Windows and Python scripts are automatically downloaded and executed to the Raspberry Pi via SSH in a one click action. The output to stdout and stderr (Python print commands and error messages) are captured and shown in a separate console-like terminal. In our opinion, this combination of Geany and RRM provides the most convenient way to program the Raspberry Pi: Just hit F9 (or press Build icon) and the current content of the editor is saved locally and transferred to the Raspberry Pi. Any other running Python program is then halted and the new script executed by Rasberry Pi's Python interpreter, reporting any error or ouput messeges back to the development system. Have a look how the Build menu is populated:
By closing the window, the program (actually the Python process) is stopped even if it hangs in a while-true loop. Other menu options are:
Installation:
|
|
Remarks:
#! /bin/sh
# Starting Python scripts from remote SSH command
case "$(pidof python2.7 | wc -w)" in

0)  sudo python -Qnew $1 2>&1
    ;;
*)  echo "Other program running. Killing..."
    sudo pkill python
    sudo python -Qnew $1 2>&1
    ;;
    esac
Highlight program code
|