| Python Exemplary |
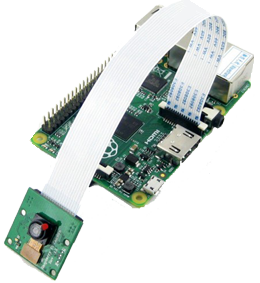
CAMERA
![]()
The source code of all examples can be downloaded from here.
Take a snapshot and store image locally |
Program:[►] # camera.py import picamera import StringIO def captureJPEG(width, height): ''' Takes a camera picture with given picture size and returns the image in JPEG format. The picture resolution is width x height (max: 5 MPix) @param width: the width of the picture in pixels (max: 2592) @param height: the height of the picture in pixels (max: 1944) return: the image in JPEG format (as string); None, if the capture fails ''' camera = picamera.PiCamera() imageData = StringIO.StringIO() w = int(width) h = int(height) try: camera.capture(imageData, format = "jpeg", resize = (w, h)) imageData.seek(0) data = imageData.getvalue() return data finally: camera.close() return None # error def saveData(data, filename): ''' Writes the given string data into a binary file. @param data: the data to store (as string type) @param filename: a valid filename in the local file space ''' file = open(filename, "wb") file.write(data) file.close() def captureAndSave(width, height, filename): ''' Takes a camera picture with given picture size and stores is in JPEG format. The picture resolution is width x height (max: 5 MPix) @param width: the width of the picture in pixels (max: 2592) @param height: the height of the picture in pixels (max: 1944) @param filename: a valid filename in the local file space, e.g. /home/pi/shot1.jpg ''' data = captureJPEG(width, height) if data != None: saveData(data, filename) Remarks: Aim: Program:[►] # Camera1.py import camera print "Capturing image..." img = camera.captureJPEG(300, 200) print "size", len(img) camera.saveData(img, "/home/pi/test.jpg") print "JPEG saved" Remarks: There are many nice projects using the camera, among them a surveillance system that detects if the image changed due to a person that enters the scene. |
|
|
Take a snapshot and transfer image to a remote system |
|
We seize the opportunity to demonstrate how to transfer data from the Raspberry Pi to a remote client by using a TCP client/server system. The code is not explained in detail, but with the help additional information found on the internet, you should be able to fully understand it. Aim: The main program starts a server listening loop, where the blocking function serverSocket.accept() waits for incoming client connection requests. After connection, server starts a new thread SocketHandler, where it handles the communication with this particular client. This is not really necessary in this situation, because there is only one client to serve, but we opt for this standard program design that is used in many other client-sever applications. Program:[►] # CameraServer.py from threading import Thread import socket import time import camera VERBOSE = False IP_PORT = 22000 def debug(text): if VERBOSE: print "Debug:---", text # ---------------------- class SocketHandler ------------------------ class SocketHandler(Thread): def __init__(self, conn): Thread.__init__(self) self.conn = conn def run(self): global isConnected debug("SocketHandler started") isRunning = True while isRunning: cmd = "" try: debug("Calling blocking conn.recv()") cmd = self.conn.recv(1024) except: debug("exception in conn.recv()") # happens when connection is reset from the peer break debug("Received cmd: " + cmd + " len: " + str(len(cmd))) if len(cmd) == 0: break rc = self.executeCommand(cmd) if not rc: isRunning = False conn.close() print "Client disconnected. Waiting for next client..." isConnected = False debug("SocketHandler terminated") def executeCommand(self, cmd): debug("Calling executeCommand() with cmd: " + cmd) if cmd == "go": print "Taking snapshot and transfer to client..." jpg = camera.captureJPEG(640, 480) return self.sendData(jpg) if cmd == "disconnect": debug("Client request disconnection") return False def sendData(self, data): debug("sendData() with len: " + str(len(data))) try: self.conn.sendall(data) except: return False return True # ----------------- End of SocketHandler ----------------------- serverSocket = socket.socket(socket.AF_INET, socket.SOCK_STREAM) # close port when process exits: serverSocket.setsockopt(socket.SOL_SOCKET, socket.SO_REUSEADDR, 1) debug("Socket created") HOSTNAME = "" # Symbolic name meaning all available interfaces try: serverSocket.bind((HOSTNAME, IP_PORT)) except socket.error as msg: print "Bind failed", msg[0], msg[1] sys.exit() serverSocket.listen(10) print "Waiting for a connecting client..." isConnected = False while True: debug("Calling blocking accept()...") conn, addr = serverSocket.accept() print "Connected with client at " + addr[0] isConnected = True socketHandler = SocketHandler(conn) # necessary to terminate it at program termination: socketHandler.setDaemon(True) socketHandler.start() t = 0 while isConnected: print "Camera ready at", t, "s" time.sleep(10) t += 10 Remarks: The client code also creates a user-defined thread Receiver that handles the incoming data independent of the main program. Again this is a usual scenario for client-server applications. Data is read in chunks with maximal 4096 bytes until an end-of-file signature is found. For JPEG files the last two bytes are 0xFF, 0xD9. The JPEG image is then displayed in a TigerJython GPanel graphics window. Closing the window by clicking the title bar close button disconnects the client and puts the server into a listening state for the next client connection. Program:[►] # CameraClient1.py # Display image in TigerJython's GPanel graphics window from threading import Thread import socket, time from gpanel import * VERBOSE = False IP_ADDRESS = "192.168.0.12" IP_PORT = 22000 def debug(text): if VERBOSE: print "Debug:---", text # --------------------- class Receiver --------------------------- class Receiver(Thread): def run(self): debug("Receiver thread started") while True: try: rxData = self.readServerData() except: debug("Exception in Receiver.run()") isReceiverRunning = False closeConnection() break debug("Receiver thread terminated") def readServerData(self): global isJPEG debug("Calling readResponse") bufSize = 4096 data = "" while data[-2:] != "\xff\xd9": # eof tag for jpeg files (both chars must be in same block) # We are not sure 100% that this sequence is never embedded in image # but it is improbable to happen at the end of the data block try: blk = sock.recv(bufSize) if blk != None: debug("Received data block, len: " + str(len(blk))) else: debug("sock.recv() returned with None") except: raise Exception("Exception from blocking sock.recv()") data += blk print "JPEG received. Displaying it..." display(data) # -------------------- End of Receiver --------------------- def startReceiver(): debug("Starting Receiver thread") receiver = Receiver() receiver.start() def sendCommand(cmd): debug("sendCommand() with cmd = " + cmd) try: sock.sendall(cmd) except: debug("Exception in sendCommand()") closeConnection() def closeConnection(): debug("Closing socket") sock.close() def connect(): global sock sock = socket.socket(socket.AF_INET, socket.SOCK_STREAM) debug("Connecting...") try: sock.connect((IP_ADDRESS, IP_PORT)) except: debug("Connection failed.") return False startReceiver() return True def display(data): img = readImage(data) if img != None: image(img, 0, 0) def onExit(): global isRunning isRunning = False dispose() width = 640 height = 480 makeGPanel(Size(width, height)) addExitListener(onExit) sock = None isRunning = True if connect(): print "Connection established" time.sleep(1) while isRunning: print "Sending command 'go'..." sendCommand("go") time.sleep(2) print "Disconnecting now..." # sendCommand("disconnect") closeConnection() else: print "Connection to %s:%d failed" %(IP_ADDRESS, IP_PORT) print "done" Remarks: Program:[►] # CameraClient2.py import webbrowser def saveData(data, filename): file = open(filename, "wb") file.write(data) file.close() def display(data): jpgFile = "c:/scratch/test.jpg" saveData(data, jpgFile) webbrowser.open(jpgFile) |