Python Exemplary
deutsch     english    

RASPIBRICK FIRMWARE INSTALLATION


Preliminary


Our SD-card installation is called RaspiBrick Firmware because it contains a few, but important addons to the NOOBS distribution.

The same firmware can be used for an independent (standalone) Raspberry Pi and one that is mounted on a Pi2Go robot, because the boot process performs the necessary selection:

  • Execution of /home/pi/raspibrick/autostart.sh. Check if /home/pi/scripts/autostart.py exits. In this case the Python interpreter executes the script and the firmware is not started.
  • Otherwise /home/pi/raspibrick/ProcessMon.py is launched. Here the GPIO pin #18 (GPIO24) is checked using a software enabled pull-down resistor. If a high level is detected, it is assumed that the Raspberry Pi is sitting on a Pi2Go robot (pin #18 corresponds to the battery monitor line). The firmware is started.
  • Otherwise it is assumed that the pin in not wired and the firmware is not started.

(See our Pi2Go/Raspibrick website for more information).

If you use the Raspberry Pi exclusively in standalone mode, you may disable this boot sequence by quitting autostart.sh in a early stage, eventually by launching your own startup Python script.

In this case, it is also possible to use a standard NOOPS or Raspbian, or a product-specific Linux installation (like Dexter's BrickPi), and add some few scripts to enable remote development with TigerJython (see appendix).


Installation with preconfigured SD-card image


We recommend to use our preconfigured SD-card image that is created by applying the manual procedure described later on. This is most easy for you because you do not have to connect any external devices (screen/keyboard/mouse) to your Raspberry Pi.

  • Download the zipped image raspibrick.zip from here. The size is about 6 GB, so be patient .

  • Unpack it in any directory (using an unpacker utility that supports large files, like WinRAR).

  • Insert a micro SD-card of at least 16 GB size (class 10 ultra, recommended).

  • Launch a tool to copy img files to SD-cards. (We recommend USBImageTool under Windows or ddutility under MacOS/Linux.) Be careful to select the SD-card drive, otherwise you may destroy data on a wrong drive .
  • In order to connect the Raspberry Pi to a WLAN router (hotspot), it has to know the SSID and the passphrase (password) of your router. These WLAN log-in information can be entered by starting our configuration tool

    RaspiBrickConfig.jar

    found on the small FAT32 partition of  the SD-card. Because it is a Java program, you need a computer with an installed JRE (Java Runtime Environment).
  raspibrick1
  • Normally you can double-click RaspiBrickConfig.jar to launch it. If this fails, enter a shell (console) and go to the SD-card drive/folder. Type java -jar RaspiBrickConfig.jar to launch the utility.

  • In the dialog box enter your router SSID and the passphrase.
    Then click Create SSID and Save.

The SD card is now ready to be used. (If the Raspberry Pi is supposed to be used with the Pi2Go robot, insert it at the robot now, so you can see LED and display information.) The first boot process takes a bit longer because some initializing processes are executed. (For use with the Pi2Go, consult the RaspiBrick firmware information.)


Manual installation (from NOOBS distribution)


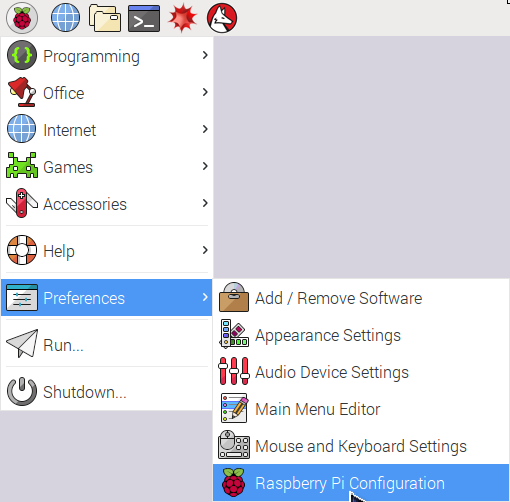
If you are interested to know how the card image is created or if you want to learn how to configure a Raspberry Pi operating system from scratch, you can follow the manual installation procedure. In this case you have to connect a HDMI monitor (or a VGA monitor connected via a HDMI-to-VGA adapter), and a USB keyboard/mouse.

  • Provide an empty micro SD-card with minimum 8 GB size (type 10 ultra recommended). The card must be FAT32 formatted. New cards are normally preformatted. If you have to format the card, use SD-Formatter.

  • Download the NOOBS distribution from www.raspberrypi.org/downloads and unpack it. Copy all files and subdirectories to the SD-card.

  • Insert the card in the Raspberry Pi and power it.

  • In the install menu select Raspbian. At the bottom line choose the language and keyboard you want to use. Click Install.

  • After the installation process (that lasts a while), the Raspberry Pi is automatically rebooted and the GUI desktop opened. Open the WLAN setup by clicking the WLAN symbol in the title bar. Enter the SSID and the security key of your router/access point. The router's DHCP server provides now an IP address. To find it out, you can move the mouse pointer on the WLAN icon and a small window will open. You may also start a terminal (icon in the title bar) and type ifconfig. The IP address is shown in the wlan0 section. Write down the address.

  • Select menu- Preferences - RaspberryPi configuration

    raspibrick1

  • Choose options from tab Interfaces:

    raspibrick2

  • Choose options in tab System / Set Resolution:

    raspibrick3
  • Right click icon VNC-Server (top left) und and select in Options:

    raspibrick4

  • Enter under Security: VNC password: 123456:

    raspibrick5

  • Enter under Connections port 5901:

    raspibrick6

  • Reboot

  • You are automatically logged-in as :
    user: pi
    password: raspberry

The basic installation is finished.


Installation of the RaspiBrick firmware

 
  • Open the console window (Terminal icon in title bar) and enter the following lines (type Enter/Return to execute, Ctrl+C to cancel):

    sudo apt-get update

    sudo apt-get upgrade (confirm all questions):


    git clone https://github.com/raspibrick/install.git


    All installation files are now in folder /home/pi/install and the addons will be installed by executing the Linux script install. First set the execution right:

    chmod +x install/install

    ./install/install (do not forget the leading dot)

    Shutdown:   sudo halt

    Turn the power off. The setup of the SD card is completed.


Change background image


You may modify the background image of the desktop in the following dialog:


Installing TigerJython on Raspberry Pi


As above, enter in a terminal the following lines (+Enter/Return):

chmod +x install/install-tj

raspibrick31

./install/install-tj    (do not forget leading dot)

raspibrick32

After you reboot, you see the TigerJython icon on the desktop. A double-click starts TigerJython in administrator mode.


Appendix: Install Remote Development for TigerJython (without RaspiBrick)


If you want to use your existing Raspberry Pi installation and enable remote development for TigerJython, just copy three shell scripts: pyrun, startApp, and rkill into the Linux path and add the /home/pi/raspibrick/Lib. Proceed as follows:

Download tjremote.zip from here and copy the file to the Raspberry Pi in /home/pi using an SFTP program. In a shell, type:

unzip tjremote -d tjremote
chmod + x tjremote/install
./tjremote/install


When downloading with TigerJython, the local Python program is copied as MyApp.py in the /home/pi/scripts directory. startApp runs MyApp.py with pyrun. /home/pi/raspibrick/lib is put into the Python path, so you can import your own modules directly. Attention: The remote shell requires the following authentication:

user: pi
password: raspberry