| Python Exemplary |
SOUND CARDS, SOUND SENSORS
![]()
The source code of all examples can be downloaded from here.
Raspberry Pi Sound System |
The Raspberry Pi is equipped with an internal sound card that outputs sound to an audio jack. Sound in different audio formats (most commonly WAV and MP3) can be played with standard sound players. From a terminal (console) you type the command aplay <mysong.wav> to play the file mysong.wav with the ALSA (Advanced Linux Sound Architecture) player via the default sound card that outputs to the audio jack. The quality is not overwhelming, so you better purchase a Raspberry Pi compatible USB sound adapter. You find many information how to change the default sound output to the USB card, but most of them are obsolete due to changes in the Linux distribution. For the current NOOBS distribution you simply edit the file .asoundrc that you find in the /home/pi folder. Change the entry card 0 to card 1.
We recommend to use the SoX (Sound eXchange) software that is considered to be "The Swiss Army knife of sound processing programs". SoX is preinstalled on our SD card distribution. To install it on pure NOOBS system, connect the Raspberry Pi to the internet and type sudo apt-get install sox Now you play a song from a terminal window with play <mysong.mp3>. Many audio formats of your sound file are supported (type sox to display them). (Consult the SoX website for more information). With SoX you can change the sound card on-the-fly by setting the environment variable AUDIODEV to hw:0 or hw:1. From the command line you enter AUDIODEV=hw:1 play <mysong.mp3> with hw:0 or hw:1 to output the song on the USB adapter of your choice without modifying the .asoundrc file. If you are uncertain about the available sound devices type aplay -l. To check the properties of the default sound card, type amixer. |
Accessing The Sound System From Python |
For the Alsa sound system the Python module pygame may be used. Unfortunately it only supports output to the built-in audio card. To use the USB sound adapter, we wrote a small Python class wrapper that spawns Linux shell commands for the SoX player. This allows you to select the sound card programmatically when constructing the player instance. You find the Python documentation here. |
Experiment 1: Play, Pause, Resume A Song |
|
Copy the song you like to play into a subdirectory of the /home/pi folder (e.g. salza1.wav in /home/pi/sound). Connect the audio jack to the input of any audio amplifier/music box/radio. The program plays the sound with half the default volume for 10 s, then pauses a while, resumes and finally stops. Download the module soundplayer.py from here and copy it into the same directory where your program resides. Have a look on the code to see how the library works. Program:[►] # Sound1a.py import time from soundplayer import SoundPlayer # Use device with ID 1 (mostly USB audio adapter) p = SoundPlayer("/home/pi/sound/salza1.wav", 1) print "play for 10 s with volume 0.5" p.play(0.5) # non-blocking, volume = 0.5 print "isPlaying:", p.isPlaying() time.sleep(10) print "pause for 5 s" p.pause() print "isPlaying:", p.isPlaying() time.sleep(5) print "resume for 10 s" p.resume() time.sleep(10) print "stop" p.stop() print "isPlaying:", p.isPlaying() print "done" Remarks: |
Experiment 2: Raspberry Pi As A Four Button Music Player |
Now you are accustomed to the basic player code, you want to use the Raspberry Pi as a multimedia desk to select and play the collection of your favorite songs (playlist). In this example we use 4 buttons, a Run, Pause, Stop and Select button and implement the following specifications:
It is highly recommended to use a state machine algorithm. Here the states are called
Program:[►] # Sound1b.py from soundplayer import SoundPlayer import RPi.GPIO as GPIO import time ''' states: STOPPED : play process terminated PAUSED: play process stopped (playing still underway) PLAYING: play process executing ''' # Button pins, adapt to your configuration P_PLAY = 24 P_PAUSE = 16 P_STOP = 22 P_SELECT = 12 def setup(): GPIO.setmode(GPIO.BOARD) GPIO.setup(P_STOP, GPIO.IN, GPIO.PUD_UP) GPIO.setup(P_PAUSE, GPIO.IN, GPIO.PUD_UP) GPIO.setup(P_PLAY, GPIO.IN, GPIO.PUD_UP) GPIO.setup(P_SELECT, GPIO.IN, GPIO.PUD_UP) setup() nbSongs = 4 songID = 0 p = SoundPlayer("/home/pi/songs/song" + str(songID) + ".mp3", 1) p.play() print "playing, song ID", songID state = "PLAYING" while True: if GPIO.input(P_PAUSE) == GPIO.LOW and state == "PLAYING": state = "PAUSED" print "playing->paused" p.pause() elif GPIO.input(P_PLAY) == GPIO.LOW and state == "STOPPED": state = "PLAYING" print "stopped->playing, song ID", songID p.play() elif GPIO.input(P_PLAY) == GPIO.LOW and state == "PAUSED": state = "PLAYING" print "paused->playing" p.resume() elif GPIO.input(P_STOP) == GPIO.LOW and (state == "PAUSED" or state == "PLAYING"): state = "STOPPED" print "paused/playing->stopped" p.stop() elif (GPIO.input(P_SELECT) == GPIO.LOW and state == "STOPPED") \ or (state == "PLAYING" and not p.isPlaying()): songID += 1 if songID == nbSongs: songID = 0 p = SoundPlayer("/home/pi/songs/song" + str(songID) + ".mp3", 1) print "stopped->playing, song ID", songID p.play() state = "PLAYING" time.sleep(0.1) # Do not waste processor time Remarks: |
Experiment 3: Sine Tone Generator |
For simple robotics applications the internal sound card quality may be good enough. The soundplayer module contains a playTone() function to play a sine tone with given frequency and duration. In the following example you use the blocking version to emit one tone after the other. Then you play all three tones together using the list notation of the frequencies parameter. Program:[►] # Sound2a.py from soundplayer import SoundPlayer import time # Sine tone during 0.1 s, blocking, device 0 dev = 0 SoundPlayer.playTone(900, 0.1, True, dev) # 900 Hz SoundPlayer.playTone(800, 0.1, True, dev) # 600 Hz SoundPlayer.playTone(600, 0.1, True, dev) # 600 Hz time.sleep(1) SoundPlayer.playTone([900, 800, 600], 5, True, dev) # 3 tones together print "done" Next we use the non-blocking version of playSound(), so our program is able to blink a LED during the emission of the tone. Program:[►] # Sound2b.py import RPi.GPIO as GPIO from soundplayer import SoundPlayer import time P_LED = 18 # adapt to your wiring def setup(): GPIO.setmode(GPIO.BOARD) GPIO.setup(P_LED, GPIO.OUT) setup() # Sine of 1000 Hz during 5 s, non-blocking, device 0 SoundPlayer.playTone(1000, 5, False, 0) while SoundPlayer.isPlaying(): GPIO.output(P_LED, GPIO.HIGH) print "on" time.sleep(0.5) GPIO.output(P_LED, GPIO.LOW) print "off" time.sleep(0.5) print "done" |
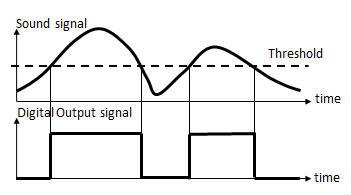
Experiment 4: Using A Sound Module To Detect A Sound Incident |
Sometimes it is amusing to perform some action by clapping, crying or whistling. To do this, a microphone has to been used that captures the sound. Normally it is not necessary to digitize the signal by an ADC and analyze it by the Raspberry Pi, which can be difficult because of the rapid change in the signal response. It is sufficient to create a low/high voltage change when the signal is greater than a certain level (or threshold). This can be done in a cheap external sound module (like the KY-038 purchased on Ebay or as part of an Arduino sensor kit).
Caution: All GPIO input voltages must be in the range 0..3.3V. Power the module with 3.3V or use a voltage divider with two resistors (or a voltage level converter). The KY-038 is a low-sensitive device and can only detect very loud sound incidents. Adjust the potentiometer so that the status LED just turns off. When you generate a sound near the microphone (e.g. by tapping on the microphone), the status LED should flash for a short time. Aim: Program:[►] # Sound3a.py # Sound Sensor Module KY-038 # Using GPIO events import RPi.GPIO as GPIO import time P_SOUND = 22 # adapt to your wiring P_LED = 24 # adapt to your wiring def setup(): GPIO.setmode(GPIO.BOARD) GPIO.setup(P_LED, GPIO.OUT) GPIO.output(P_LED, GPIO.LOW) GPIO.setup(P_SOUND, GPIO.IN) GPIO.add_event_detect(P_SOUND, GPIO.BOTH, onButtonEvent) def onButtonEvent(channel): global isOn if GPIO.input(P_SOUND) == GPIO.HIGH: isOn = not isOn if isOn: GPIO.output(P_LED, GPIO.HIGH) else: GPIO.output(P_LED, GPIO.LOW) # Have to wait a while # because event is triggered several times (like button bouncing) time.sleep(0.5) setup() isOn = False while True: time.sleep(0.1) Remarks: |